First incursions into Computer Vision
I took a few days off and decided to dive into a completely unexplored domain. With all the hype in ML and AI, I figured I would look into that first.
However, for me, theory with no application is not very attractive. I suspected I would get bored, distracted, and achieved little. So I thought deeper into building something useful. I was in the middle of a (somewhat challenging) workout when I had an idea: would it be possible to build an app that could track my deadlifts and tell me if I was doing something wrong? Sort of a “virtual coach” for deadlifts.
I imagined having a camera on my side that would track the movements in real-time, alerting me when I lose proper form.
The exciting thing about it is that I didn’t know where to start. Image and video processing are outside my league. Great!
Some extensive googling took me to an entirely new domain. I love increasing awareness of my ignorance.
“You should keep learning as long as you are ignorant, – even to the end of your life if there is anything in the proverb. And the proverb suits the present case as well as any: “As long as you live, keep learning how to live.” For all that, there is also something which I can teach in that school. You ask, do you, what I can teach? That even an old man should keep learning.” - Seneca
OpenCV
Wow. Just wow. This library is amazing. I have barely scratched the surface on what it can do, but even the simplest tutorials can allow you to do amazing things with just a few lines of code.
OpenCV is an open source library developed by Intel more than 20 years ago! It’s a massive library. I followed these instructions to install the source, compile it, and run it. It took me hours with many trial and errors. However, eventually, it all worked out, and I had all the tests working.
OpenCV is a C++ library, and I’m sure it would be a great case study. However, that will have to wait.
I’ve always found reading someone else’s codebase an excellent learning tool.
First attempt
Without knowing anything I figured it would be easier to detect well-defined spots on a picture (say a green dot). After all, following a deadlift movement is about tracking the motion of the hinge in your hips: between the back and your hamstrings. Also, the barbell should move as vertically as possible throughout the movement.
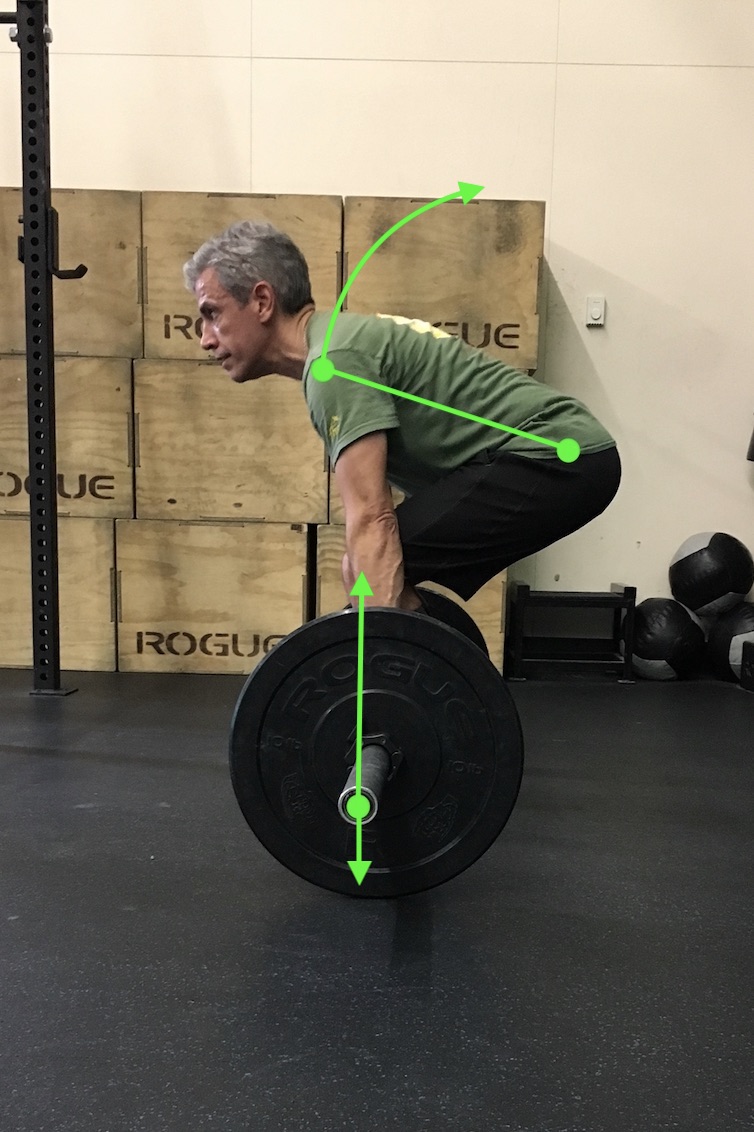
So I set my first goal to be able to detect the shoulder, the hip, and the bar as seen from the side as seen in the picture above.
To make things simpler, I just pasted a green dot on the picture (as if I was wearing a sticker) and saw how far I could go.
C++ or Python
I like and enjoy writing C++ code. I use it extensively for all my hardware projects. However, I wanted fast iterations and made it easy to run many trial and errors, so I opted to install Python, and bindings for OpenCV. These are wonderful, and allows me to throw something on the script quickly, have a terminal window ready and try very quickly. So, Python it is!
I know very little Python. My son Agustin taught me the little I know. So, double challenge! New domain, new language.
First result
I googled my way around this first assignment. I ran my algorithm on the picture and … WOW:
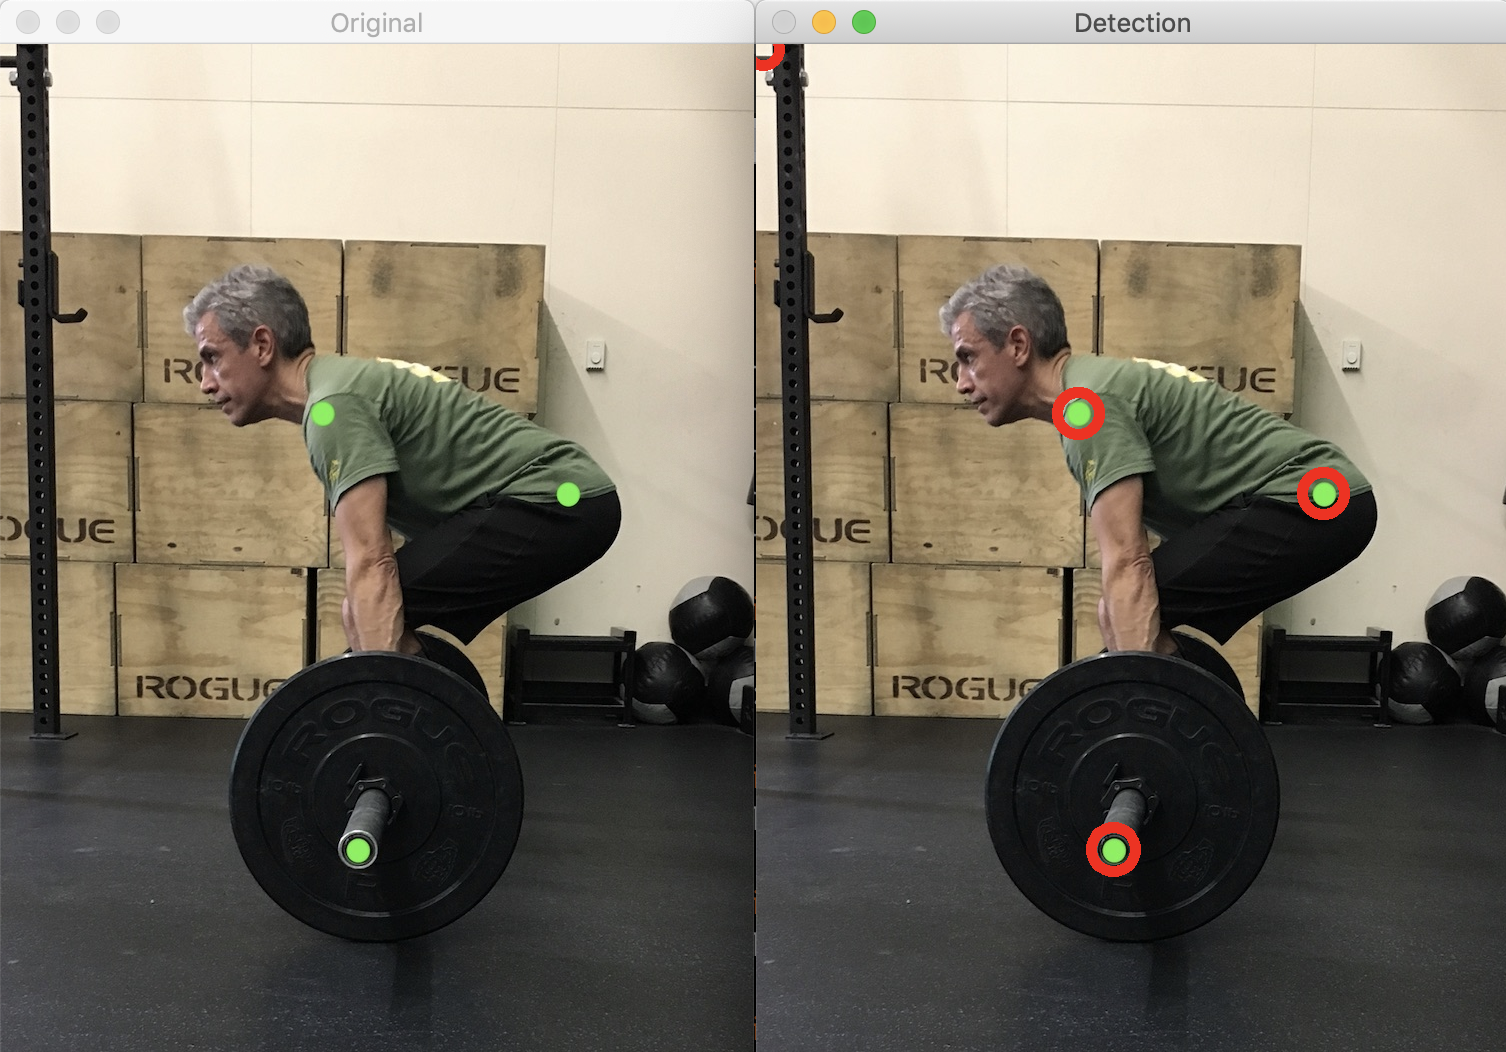
I hardly believed it.
The first picture is the original frame with the added “stickers.” The second picture is the original with new red circles drawn over the detected coordinates: SUCCESS!
The code
# # import the necessary packages
import numpy as np
import argparse
import cv2

# Draws detected circles
def draw_keypoints(vis, keypoints, color = (0, 255, 255)):
    for kp in keypoints:
            print(kp.size)
            print(kp.pt)
            x, y = kp.pt
            cv2.circle(vis, (int(x), int(y)), int(kp.size), color, 10)

# construct the argument parser and parse the arguments
ap = argparse.ArgumentParser()
ap.add_argument("-i", "--image", required = True, help = "Path to the image")
args = vars(ap.parse_args())

image = cv2.imread(args["image"])
original = image.copy()

params = cv2.SimpleBlobDetector_Params()
params.filterByColor = True;
params.blobColor = 255;

detector = cv2.SimpleBlobDetector_create(params)
keypoints = detector.detect(original)

draw_keypoints(image, keypoints, (0,0,255))

cv2.imshow("Original", original)
cv2.imshow("Detection", image)
cv2.waitKey(0)
I am sure this is far from optimal. I still don’t fully understand how it works, to be frank (kind of), but this early success has encouraged me to continue this journey. Perhaps more impressive, all this can be achieved with less than 40 lines of code. Most of which are boilerplate/helper instructions anyway. The actual magic happens in SimpleBlobDetector_create().detect().
Of course, I’m standing on the shoulder of a giant, fantastic library!
There’re many versions of Python and many versions of OpenCV. Each one has its and incompatibilities. I googled and stackoverflowed many of those to find my way around. The code sample above runs on OpenCV 4.0.0 and Pyhton 3.7.3
What’s next
I’m excited about the opportunities, so I decided to take a course on OpenCV and minimize my trail and error method. I found this course on Udemy with great reviews, so…back to school, I guess.
The number of resources available at incredibly low cost, to learn anything amazes me. Makes me grateful to live in this time.
Next step in the project is actually to detect real stickers. I wonder how that will perform as the color is not as perfect as a fake one.
Also, I wonder if I can detect the plate without the sticker. OpenCV has a circle detection algorithm, but my early attempts were not successful, so I’ll wait until I learn more.
Another area for me to explore is tracking each point as I move.