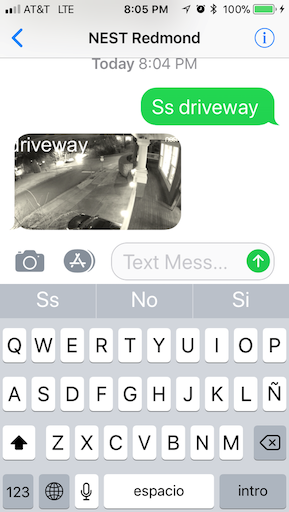
Interacting with a NEST Camera with SMS
In this post I’m expanding my experiments with the NEST API from thermostats to cameras.
After not liking the API intially, I actually like it now quite a bit. Found it fairly intuitive.
Dealing with Cameras is straight forward. There’re all kinds of things you can do: turn it on/off, get status, get a snapshot, etc. Full details are available here for those interested.
For my little app, I wanted to simply request a snapshot to be delivered to my phone:

The overall steps are:
- Send “Snapshot” command to my app (e.g.
ss living room) - Go through the usual steps of obtaining the NEST
access_tokenas described before (lookup the user with phone as input, get theaccess_tokenfrom the user profile using Auth0 Management API). - Call the NEST API and obtain the
snapshot_urlproperty in thecameradevice. - Respond to Twilio with the URL.
Good news is that Twilio will do all the hard work of retrieving the image from the URL, resize it, deliver it to the phone (if capable), etc.
This first version was really simple to put together.
Now…NEST image is pretty large, and it takes a little bit of time for the final snaphsot to make it into the phone. But more importantly, I wanted to be able to manipulate the image a little bit (add a caption, maybe re-color it, etc.). I was expecting a daunting task with this, especially with a nodejs backend, but after a little bit of poking here and there, I found this amazing library: JIMP.
JIMP: The “JavaScript Image Manipulation Program” :-) An image processing library for Node written entirely in JavaScript, with zero native dependencies.
And in no time, I was able to do all kinds of things: apply filters for colors: grayscale, sepia, add labels, resize images, crop, you name it.
So my getCameraSnapshot command handler ended up being like this:
function getCameraSnapshot(auth,store,phone,name,done){
  var locals = {};
  locals.result = {};
  async.series([
      //Get an Auth0 Mgmt API Token to query user with the set phone
      (cb)=>{
        getAuth0AccessToken(auth.client_id,auth.client_secret,(e,t)=>{
          if(e) { return cb(e); }
          locals.access_token = t;
          cb();
        });
      },
      //Locate the user with the phone
      (cb)=>{
        findUserByPhone(locals.access_token,phone,(e,user)=>{
          if(e) { return cb(e); }
          locals.user = user;
          cb();
        });
      },
      //Call NEST API with access_token
      (cb)=>{
        request.get('https://developer-api.nest.com',{
            headers:{
              Authorization: 'Bearer ' + locals.user.identities[0].access_token,
            }
        },(e,s,b)=>{
          if(e){ return cb(e); }
          if(s.statusCode !== 200){
            return cb('Error calling NEST. Try subscribing again');
          }
          var NESTInfo = JSON.parse(b);
          var camera = _.find(NESTInfo.devices.cameras,(c)=>c.name.toLowerCase()===name.toLowerCase());
          if(!camera){ return cb('Camera not found'); }
          locals.camera = camera;
          cb();
        });
      },
      (cb)=>{
        var j = require('jimp@0.2.28');
        j.read(locals.camera.snapshot_url,(e,image)=>{
          if(e){ cb(e); }
          image.resize(550,j.AUTO);
          image.sepia();
          j.loadFont(j.FONT_SANS_64_WHITE, (e,font)=>{
            if(!e){
              image.print(font, 0,0, name);
            }
            image.getBase64(j.MIME_JPEG,(e,base64Image)=>{
              if(e){ return cb(e); }
              locals.base64Image = base64Image;
              cb();
            });
          });
        });
      },
      (cb)=>{
        saveCompressedImage(store,phone,locals.base64Image,(e,url)=>{
          if(e){ return cb(e);}
          locals.snapshot_url = url;
          cb();
        })
      }
    ],(e)=>{
    if(e) { return done(e, 'Error getting snapshot'); }
    done(null,locals.snapshot_url);
  });
}
This is the critical step of the async.series array that does the trick:
...
(cb)=> {
  var j = require('jimp@0.2.28');
  j.read(locals.camera.snapshot_url,(e,image)=>{
          if(e){ cb(e); }
          image.resize(550,j.AUTO);
          image.sepia();

          j.loadFont(j.FONT_SANS_64_WHITE, (e,font)=>{
            if(!e){
              image.print(font, 0,0, name);
            }
            image.getBase64(j.MIME_JPEG,(e,base64Image)=>{
              if(e){ return cb(e); }
              locals.base64Image = base64Image;
              cb();
            });
          });
        });
}
...
- First I load the image, using the camera’s
snapshot_urlproperty.JIMP.readtakes a file, a buffer or a URL. Very convenient. - If all goes well, you get an
imageobject in the callback that you can manipulate directly. - I then resize it to 550 pixels wide (and AUTO height).
- Then use a
sepiafilter, because…why not? - Finally, I apply a label with the name of the camera on it.
JIMP comes with a few built in defaults for many things. Fonts being among them. But you can also load fonts from a URL.
The image.getBase64 method generates a base64 encoded string of the JPG image. Twilio works with a URL, and I cannot save the processed image back to NEST. So the final step of the process is to save the base64 encoded image someplace it can be accessed via HTTP. One option I considered was using S3 or some other higher-end storage system. But this is a simple project with very low traffic, so I opted to store this in Webtask storage itself. No picture will be too large:
...
(cb)=>{
        saveCompressedImage(store,phone,locals.base64Image,(e,url)=>{
          if(e){ return cb(e);}
          locals.snapshot_url = url;
          cb();
        })
      }
...
and
function saveCompressedImage(store,phone,image,done){
  store.get((error, data)=>{
      if(error){ return done(error); }
      if(!data){ data = {}; }
      if(!data.snapshots){
        data.snapshots = {};
      }
      if(!data.snapshots.image){
        data.snapshots.image = {};
      }
      var id = uid(20);
      data.snapshots.image[id] = {
                                phone: phone,
                                base64Image: image,
                                created_at: new Date()
                             };

      store.set(data,(error)=>{
          if(error){ return done(error); }
          done(null,util.format('https://%s/nest-sms/snapshots/%s','{YOUR WT BASE URL}',id));
      });
    });
}
In addition to this, the WT now has an endpoint to serve the image directly:
server.get('/snapshots/:id',(req,res,next)=>{
  var ctx = req.webtaskContext;
  var locals = {};
  async.series([
    (cb)=>{
      //get image from store
      ctx.storage.get((e, data)=>{
        if(e){ return cb(e); }
        var image = data.snapshots.image[req.params.id];
        if(!image){ return cb(new Error('No snapshot available.')); }
        locals.data = data;
        locals.base64Image = image.base64Image.substring(image.base64Image.indexOf(',')+1); //Deletes header
        cb();
      });
    },
    (cb)=>{
      //Get the binary image & send
      var j = require('jimp');
      j.read(new Buffer(locals.base64Image,'base64'),(e,image)=>{
        if(e){ return cb(e); }
        delete locals.base64Image;
        res.set({'Content-Type': image.getMIME()});
        image.getBuffer(j.AUTO,(e,buffer)=>{
            if(e){ return cb(e); }
            res.send(buffer);
            cb();
          });
      });
    }
  ],(e)=>{
    //delete the image from store
    if(e){ next(e); }
    if(locals.data){
      delete locals.data.snapshots.image[req.params.id];
      ctx.storage.set(locals.data,(e)=>{
      });
    }
  });
});
There’s a header
data:image/jpeg;base64that gets added at the beginning of the stream when you callimage.getBase64.
That’s it!