Securing a Google Cloud Endpoint API with Auth0
TL;DR
Securing a Google Cloud Endpoints fronted API using Auth0 is straightforward, requiring minimal configuration and setup.
Google Cloud Endpoints
Google Cloud Endpoints is an NGINX-based proxy you can use to front apps deployed on the Google Cloud environment. As an API gateway it provides a number of features for securing, monitoring and overall management of programmatic access to your apps.
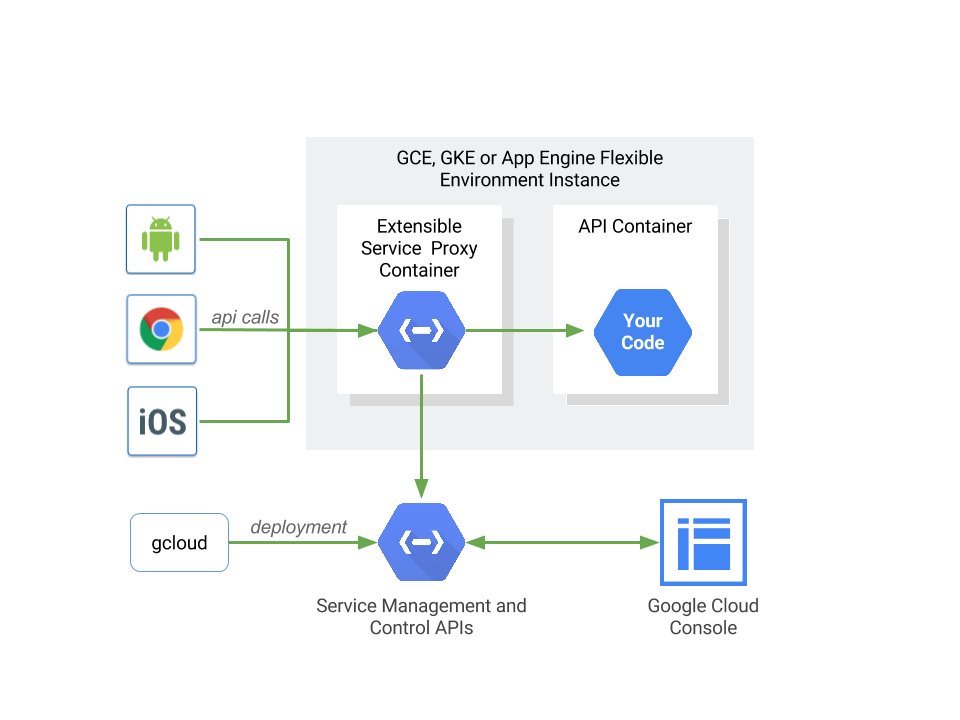
GCE uses OpenAPI to describe what and how your API behaves. The spec allows you to describe in depth and breadth your API endpoints, input and output, errors, and of course the security description.
Securing GCE
Defining an API in Auth0
This is the easy part. Just open the Auth0 Dashboard, under APIs and define a new record:

Keep the identifier handy, as you will need it in the next step (e.g. http://google_api in the screenshot above).
You can optionally define scopes, but we are going to keep it super simple for now.
Securing your API
The first step of course is having a working app. Just follow the GCE Quickstart that will give you a very simple working app/API.
This app has a single operation: GET /airportName. You pass a parameter in the querystring with an airport code:
$ curl https://{YOUR GC PROJECT}.appspot.com/airportName?iataCode=SFO
$ San Francisco International Airport
Just follow all steps in the tutorial. That will setup everything for you.
Then open the openapi.yaml file and add a new SecurityDefinition section:
securityDefinitions:
  auth0_jwt:
    authorizationUrl: "https://{YOUR AUTH0 ACCOUNT}.auth0.com/authorize"
    flow: "implicit"
    type: "oauth2"
    x-google-issuer: "https://{YOUR AUTH0 ACCOUNT}.auth0.com/"
    x-google-jwks_uri: "https://{YOUR AUTH0 ACCOUNT}.auth0.com/.well-known/jwks.json"
    x-google-audiences: "http://google_api"
The important elements here are the x-google-... ones:
x-google-issuer: this should be"https://{YOUR AUTH0 ACCOUNT}.auth0.com/"x-google-jwks_uri: this is the metadata endpoint that contains key information. It is always:"https://{YOUR AUTH0 ACCOUNT}.auth0.com/.well-known/jwks.json"(you can open the link wth a browser. Among other things you will find thepublic keyused to validate the signature of the JWT issued by Auth0)x-google-audiences: this is an identifier for the API itself. It must match what you defined on Auth0 dashboard for the API.
Now add a security element to the endpoint itself:
paths:
  "/airportName":
    get:
      description: "Get the airport name for a given IATA code."
      operationId: "airportName"
      parameters:
        -
          name: iataCode
          in: query
          required: true
          type: string
      responses:
        200:
          description: "Success."
          schema:
            type: string
        400:
          description: "The IATA code is invalid or missing."
      security:
       - auth0_jwt: []
The important line is the last one. Here we are telling the GCE proxy that our /airportName path expects to be secured with the auth0-jwt definition.
Redeploy everything (Google’s quickstart conveniently gives you 2 scripts for this: deploy_api.sh and deploy_app.sh). And when that is complete, if you try to call the API again with no security you will get:
$ curl --request GET --url https://{YOUR GC PROJECT}.appspot.com/airportName?iataCode=SFO
{
 "code": 16,
 "message": "JWT validation failed: Missing or invalid credentials",
 "details": [
  {
   "@type": "type.googleapis.com/google.rpc.DebugInfo",
   "stackEntries": [],
   "detail": "auth"
  }
 ]
}
Which is exactly what we want!
Now go back to the Test tab on your API definition on the Auth0 Dashboard, and copy the test token:

$ curl --request GET --url https://{YOUR GC PROJECT}.appspot.com/airportName?iataCode=SFO --header 'Authorization: Bearer eyJ0eXAiOiJKV1QiLCJhbGciOiJSUzI1NiIs..........7GM9QFkBtDzvf_H6xTUA'

San Francisco International Airport
Voila!